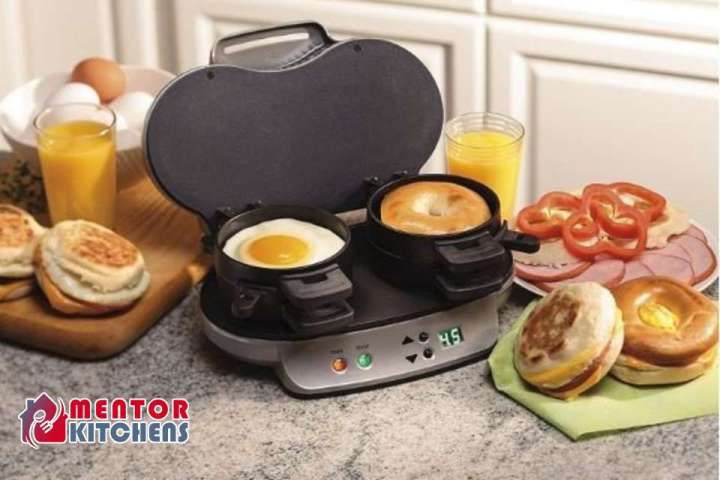
Hamilton Beach Breakfast Sandwich Maker is a convenient kitchen appliance that allows you to make a perfect breakfast sandwich in just a few minutes. Whether you are in a hurry or want to enjoy a hearty breakfast, this appliance makes it easy to prepare a delicious sandwich
In this article, we will provide a step-by-step guide on how to use the hamilton beach breakfast sandwich maker. We will cover everything from preparing the ingredients to cleaning the appliance after use.
How to Use Hamilton Beach Breakfast Sandwich Maker:

Using the Hamilton Beach Breakfast Sandwich Maker is a simple process that can help you save time and effort in the kitchen. Here is a step-by-step guide on how to use this appliance:
Step 1: Preheat the Appliance
The first step in using Hamilton Beach Breakfast Sandwich Maker is to preheat the appliance. Simply plug it in and wait for it to heat up. Once it’s heated, the green light will turn on, indicating that it’s ready to use.
Step 2: Prepare Your Ingredients
While the appliance is heating up, prepare your ingredients. You can use a variety of ingredients to make your sandwiches, such as eggs, cheese, meat, and vegetables. Make sure to slice them thinly so that they cook evenly in the appliance.
Step 3: Assemble Your Sandwich
Once the appliance is heated and your ingredients are prepared, it’s time to assemble your sandwich. Place the bottom half of the English muffin or bread on the bottom plate, followed by your ingredients. If you’re using an egg, crack it onto the egg plate and add salt and pepper to taste.
Step 4: Close the Lid and Cook
Once your sandwich is assembled, close the lid of the appliance and wait for it to cook. The cooking time may vary depending on your ingredients and personal preferences, but it typically takes about five minutes. You’ll know your sandwich is ready when the green light turns off.
Step 5: Serve and Enjoy
When your sandwich is ready, open the lid and use a spatula to remove it from the appliance. Serve it hot and enjoy!
Tips:
- Experiment with different types of bread and fillings to customize your sandwiches to your taste.
- For added convenience, you can prep and freeze your sandwich ingredients in advance, making it even easier to whip up a quick breakfast on busy mornings.
- Be sure to clean the appliance thoroughly after each use to ensure it stays in good working condition. Simply wipe the non-stick surface with a damp cloth and let it cool before storing it away.
Here is a Video Guide:
Cleaning Guide:
Cleaning the Hamilton Beach Breakfast Sandwich Maker is a quick and easy process that can help extend the life of the appliance and ensure it is in good working condition. Here are some simple steps to follow when cleaning your Hamilton Beach Breakfast Sandwich Maker:
- Unplug the appliance and let it cool down completely before cleaning.
- Wipe the non-stick surface with a damp cloth or sponge. Avoid using any harsh scrubbers or abrasive cleaners, as these can damage the non-stick coating.
- If there are any stuck-on bits of food, use a small brush or toothbrush to gently scrub the edges of the rings where the egg and fillings go.
- Dry the surface with a clean cloth or towel.
- Store the appliance in a dry place, making sure the cord is not twisted or tangled.
Cleaning Tips:
- Be sure to clean the appliance after each use to prevent food from drying on the surface and becoming harder to remove.
- If the non-stick surface becomes scratched or damaged, it is best to replace the appliance to ensure optimal performance and safety.
Frequently Asked Questions:
Can I Use Any Type of Bread with the Hamilton Beach Breakfast Sandwich Maker?
Yes, you can use any type of bread that fits in the appliance. Some popular options include white bread, whole wheat bread, and English muffins.
Can I Add Other Ingredients to My Breakfast Sandwich Besides Eggs, Cheese, and Meat?
Yes, feel free to get creative with your fillings! Some ideas include sliced tomatoes, spinach, avocado, and cooked vegetables. Just be sure to not overstuff the sandwich, as it may be difficult to close the lid and cook evenly.
Can I Use the Hamilton Beach Breakfast Sandwich Maker to Cook Eggs Without the Bread?
Yes, you can use the appliance to cook eggs alone. Simply crack the eggs into the center ring and cook until they reach your desired level of doneness.
Can I Use the Hamilton Beach Breakfast Sandwich Maker to Cook Sandwiches Other than Breakfast Sandwiches?
While the appliance is specifically designed for breakfast sandwiches, you can certainly get creative and use it to cook other types of sandwiches as well. Just be sure to adjust the cooking time as needed for the ingredients you are using.
How Do I Clean the Hamilton Beach Breakfast Sandwich Maker?
To clean the appliance, simply wipe the non-stick surface with a damp cloth after it has cooled down. Be sure to not use any harsh scrubbers or abrasive cleaners, as these can damage the non-stick coating. You can also use a small brush or toothbrush to clean the edges of the rings where the egg and fillings go.
Can I Use the Hamilton Beach Breakfast Sandwich Maker to Cook Frozen Items, like Pre-made Breakfast Sandwiches or Frozen Waffles?
Yes, the appliance is designed to cook frozen items as well as fresh ingredients. Just be sure to follow the recommended cooking times for frozen items as specified in the appliance’s manual.
Conclusion:
In conclusion, the Hamilton Beach Breakfast Sandwich Maker is a convenient and easy-to-use appliance that allows you to make delicious breakfast sandwiches at home in just minutes.
Whether you’re a busy professional or a parent trying to feed your family a healthy breakfast, this appliance can help you save time and effort.
By following the steps outlined in this article and the accompanying YouTube video, you can confidently use the Hamilton Beach Breakfast Sandwich Maker to create a variety of customized breakfast sandwiches.
Be sure to clean the appliance thoroughly after each use and replace it if the non-stick surface becomes damaged to ensure optimal performance and safety.


Leave a Reply